

There is a channel on television that is solely devoted to do-it-yourself electronic projects. This channel provides coverage for a variety of boards, including Arduino, raspberry PI, esp8266, and esp32, among others. We will learn how to use the ili9341 driver with both the Arduino Uno and the esp32 board today. The Arduino Uno and the esp32 board will be in charge of driving the 2.8-inch touch screen.
In order to get our bearings, let's begin by concentrating on the monitor by itself and taking a closer look at it. The scale on which the 1 is measuredThe fact that the screen can also be touched is an additional benefit, and there is a slot that can be used to insert SD cards on the back of the device. I do not believe that the price of display is unreasonable; it is approximately $11 per item, and I think that this is a reasonable price for what the show has to offer. Needs additional citations
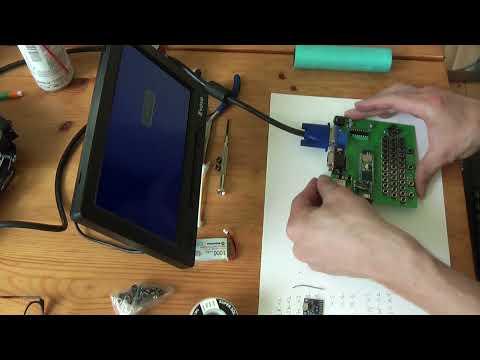
You can access the link by looking for it in the description that can be found further down on this page. We are able to connect the monitor to any board by utilizing this method, which enables us to connect the small tft display to the Arduino Pro mini, STM32, esp8266, and esp32. The more expensive nextion display has been the only touchscreen that we have been able to use on these circuit boards up until this point. Now that that is out of the way, let's take a look at the various ways in which this monitor can be connected to Arduino UNO. If we do not connect all nine of the first pins on the display, we will not be able to use the touch function, and as a consequence, we will not be able to use the display itself. As a consequence of this, we will be able to make use of the display for the more typical function that it serves. As a consequence of this, in order for us to be able to operate it with a circuit board that has a logic level of 5V, such as an Arduino uno, we will need to use some resistors that have a value of 10K. In order to establish a connection between the small tft screen and the Arduino Uno, it will be necessary for us to follow the steps outlined on this diagram. The following step entails loading the demonstration sketch into memory. As can be seen, the only device that is capable of driving such a large screen is an Arduino uno, which possesses 8 bits of processing power and 2 KB of memory. This is the only device that has these specifications. As can be observed, the display, on the other hand, does not appear to update itself in a particularly timely fashion. In spite of this, it is able to display text at a more rapid pace. It should not come as much of a surprise to anyone that an Arduino Uno does not have the power to be able to drive a display with such a high resolution because of its low power consumption. Because I was curious about learning more about timekeeping and temperature measurement, I decided to construct a straightforward real-time clock and temperature meter for my own use. I will use this clock and meter for my own purposes.
I updated the code for the previous project in order to make use of a monitor that was more recent and capacious. In addition, I added a ds3231 RTC module. The project is currently running, but there will almost certainly be a momentary lag before the values that are displayed on the screen are brought up to date. This project demonstrates, in my opinion, that the only time monitors can be used with an 8-bit Arduino is for very basic projects that only occasionally update the screen. This is the only circumstance in which monitors can be used with an Arduino. To my knowledge, this is the only scenario in which monitors can be used in conjunction with an Arduino. The process of connecting the last five pins to the circuit board in accordance with the schematic diagram has just been completed, and at this point, we are prepared to upload the second schematic diagram to the circuit board. To my complete and utter surprise, the touch demo runs at a speed that is respectable! This is just a rough draft; using this pen, we are going to draw on the screen. The following is just a rough draft. Let's get that out of the way so we can move on to the next step, which is to connect the display to the esp32 board. Let's get that done so we can move on to the next step. If you are not familiar with esp32, it is a board that is compatible with Arduino and is very quick in addition to being very inexpensive. If you are interested in learning more about esp32, click here. If you have experience working with esp32, you might find the information that follows to be helpful. Because the logic level on the esp32 board is set to 3, the reason for this is as follows:
Because of this, in the event that we do not require the touch function, we will connect the display in accordance with the representation that is depicted diagrammatically in this section. When we upload the same sketch that we had been using on Arduino uno in the past, we will notice that the speed of the esp32 is noticeably faster. This will be something that we are able to observe. At the moment, I am working on putting the finishing touches on another piece of content that is associated with this monitor and the ESP32 board. Coming soon. If we are not going to use the touch function of this display on Arduino, we will need to install the adafruit ili9341 driver in addition to the adafruit gfx library, both of which you are probably already familiar with. If we are not going to use the touch function of this display on Arduino, we will not need to install either of these. There is no requirement for either of these to be installed if we are going to make use of the touch function. In conclusion, small tft display I am of the opinion that this is an excellent display that we will be able to make use of for the projects that we will be working on in the foreseeable future. It is my opinion that I will make extensive use of displays of this type on STM32 and esp32 boards as a result of the fact that it is simple to use, that it includes a touch function, and that it is reasonably priced. The reasons for this opinion are as follows: the display is reasonably priced, it includes a touch function, and it is reasonably priced. In the shortest amount of time possible, I plan on constructing an entire project that revolves around this monitor, carrying out additional tests on it, and determining what capabilities it possesses. If you would be so kind as to share your thoughts with us in the space provided below, we would be very grateful. Thank you. Even though this is your first time visiting the site, I will gladly let you subscribe to it even though it is your first time here. If this is your first time visiting the site, I will let you subscribe. In my opinion, anything can be manufactured, and anyone can start their own manufacturing business if they so choose. I also believe that anything can be created.
As a consequence of this, I came to the conclusion that it would be beneficial for me to start broadcasting on this channel so that I could both teach others what I've learned and benefit from the knowledge and experience of other members of the community. I'm going to have to bid you farewell for the time being, but I'll see you in the next chapter! If you could possibly translate these subtitles into English, that would be very helpful.